
Easily Top 5 bread mix-ins, here is the ever popular No Knead Cheddar Jalapeño Artisan bread! This loaf of bread is very simple to make, beyond delicious, and a huge crowd pleaser – I can’t wait for you to try it
*this point may contain affiliate links. This means that a small portion of the profits go to me, at no extra cost to you. Thank you for supporting the brands that make Lion’s Bread possible.
I have to admit, I was a late adopter of jalapeños. In fact, I didn’t know that I loved spicy foods until I was an adult! Now, I cannot get enough of them, and will ALWAYS have a little something spicy on my plate – it really opens up the appetite, and enhances flavors.
When I first teased on instagram that I was testing this No Knead Jalapeño Cheddar Artisan Bread, I was overwhelmed (!!) but he amount of DM’s begging for the recipe. Turns out, you all LOVE this flavor combo too!
So let me break it down for you…
How to Make Homemade Jalapeño Cheddar Bread
I know it may seem hard to believe, but making really homemade bread is a lot easier than you might think.
We’re only using a few ingredients, and the amount of actual hands on work is very minimal. Most of the time, you’re just waiting around for the dough to bulk ferment/proof/rise (all the same thing!). The No Knead method couldn’t be easier!
- In a large mixing bowl, combine the flour, kosher salt, dry active yeast, diced jalapeno pepper, and grated cheddar cheese. Use a wooden spoon to mix. Add the water, and stir until blended, and a shaggy dough has formed.
- Cover the bowl with plastic wrap, then drape a kitchen towel over the plastic. Let the dough rest for 10-12 hours at room temperature, preferably around 70*F or less.
- Preheat the oven to 450*F. Place a dutch oven into the oven while it is preheating. The dutch oven should be heated for at least 15 minutes, once the oven reaches 450*F. The dough is ready when it is very puffy, jiggly, and the surface is full of air bubbles. Generously flour a work surface, and gently slide the dough out of the bowl, onto the floured surface. Use a rubber spatula around the bowl to release the sticky dough, to avoid disturbing the air bubbles in the dough as much as possible.
- Sprinkle the top of the dough lightly with flour, and gently fold the corners of the dough into the center. Flip the dough over, so the folds are facing down. Sprinkle a bit more flour, and gently shape the dough into a ball by pulling it towards you a few times. Don’t knead, just a few times until a round shape is formed.
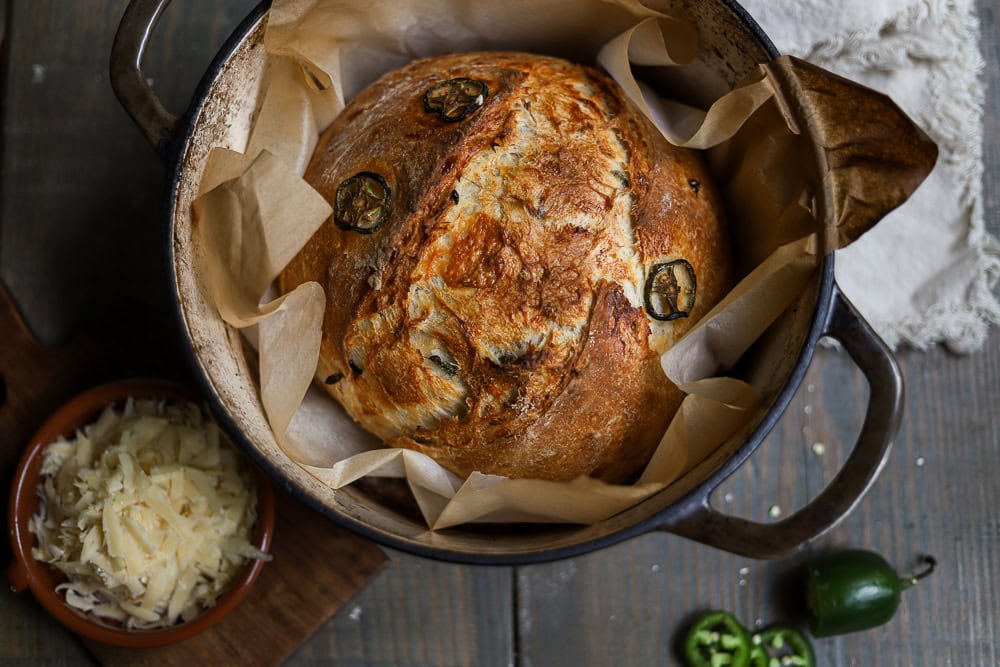
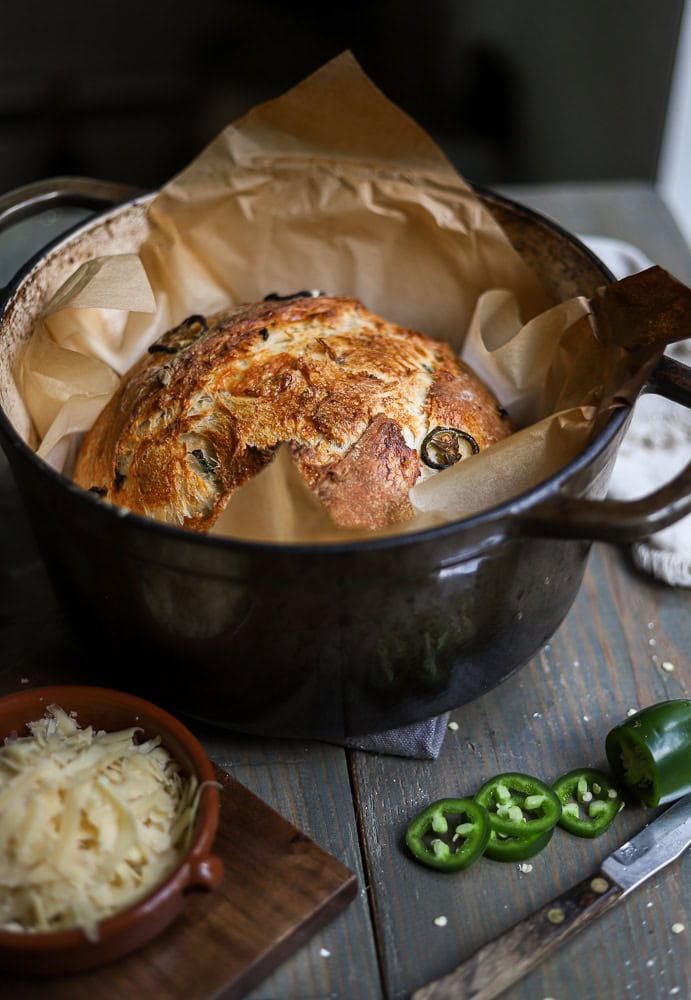
- Place the dough, seam side down, on a sheet of parchment paper. Use a sharp knife to quickly slash the top. Garnish the top with a few rings of sliced jalapeno.
- With oven mitts, carefully remove the preheated dutch oven from the oven, and place on a trivet or on the stove. Remove the lid. Pick up the parchment paper with the dough on it, and place it in the dutch oven. Put the lid back on, and bake for 25 minutes. Remove the lid, and bake for another 20-25 minutes until the crust is deeply golden brown. Let the bread cool completely on a baking rack, before slicing it, at least 2 hours.
Want more simple bread recipes? Of course you do, check out:
Cheesy Garlic Cheddar Focaccia with Rosemary
Baking Schedule
8:00 pm – Mix up all the dough ingredients by hand in a large bowl. Cover with plastic wrap and let it rise overnight at room temperature.
The next morning:
7/8:00 am – Shape the bread into a round loaf shape. Let proof for 1 hour. Preheat oven with Dutch oven inside.
9:00 am – Bake!
Ingredients you’ll need
- unbleached all purpose flour – I use unbleached all purpose flour from King Arthur Baking Company. It has a higher protein content than most AP flours. You could use bread flour if that’s what you have.
- yeast – I use dry active yeast in this recipe, and my favorite brand is Red Star Yeast for its consistent and professional results. I mix the dry active yeast with the warm water to activate it, or “wake it up.” Also, I always store my yeast in the fridge to prolong its shelf life.
- kosher salt – I use Morton’s kosher salt in all of my bread recipes. If you are using Diamond Crystal, add another 4 grams of salt.
- water – I use water that’s about 85 degrees F, slightly warmer than room temperature. It’s important that the water is not too hot, otherwise it will kill the yeast, and your rolls won’t rise properly. A lot of the tap water in the US is treated with chemicals like fluoride and chlorine, which can negatively affect the rise of our dough. To avoid this, I prefer to use filtered spring water for all of my bread baking.
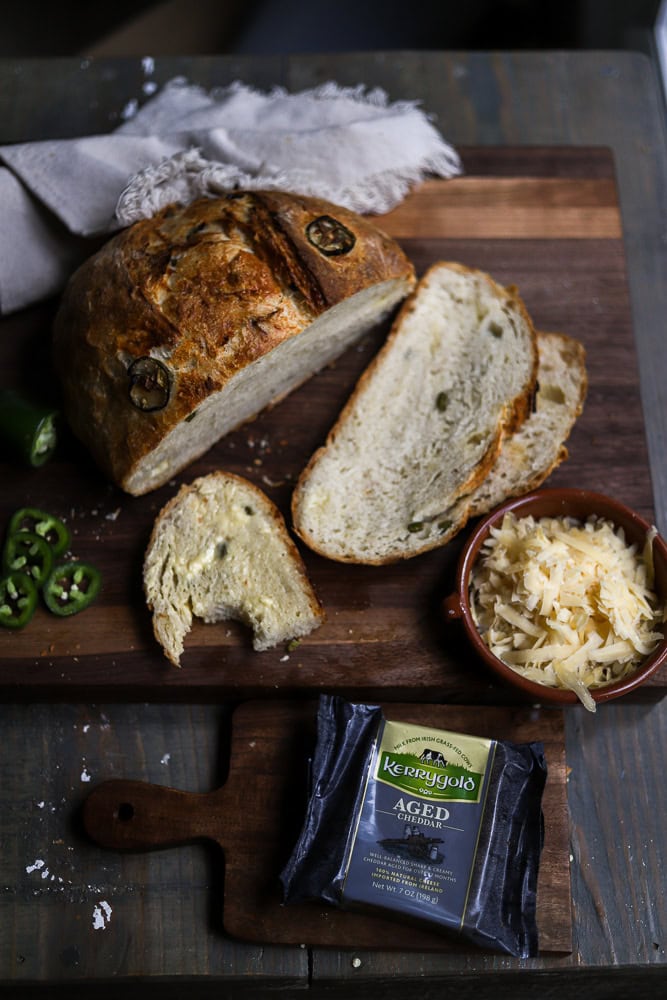
- sharp cheddar cheese – The cheese is such an amazing to this No Knead bread, because it gives it a very rich nutty flavor. I like to shred mine so that it incorporates into dough easier. If you feel like experimenting, you can always shred half of the amount of cheese, and make tiny cubes with the rest to give you very cheesy little pockets in the bread. Yum!
- jalapeño peppers – I prefer to use fresh jalapeno peppers here because I really like their flavor. If you’re partial to the jarred version, drain and dry them very well so they don’t add more moisture to the dough.
Helpful Tips from a Pro Baker
- Check to make sure that your yeast is fresh and active. If it’s been a while since you bought it, or used it, spoon 1/2 teaspoon of yeast in a 1 cup of warm water, whisk, and let it stand at room temperature for 5-7 minutes. It should bubble up and become foamy on top (it’s alive!). If nothing happens, it might be old. Toss it out, and get new yeast!
- I like to store my yeast in an airtight jar in the fridge to maintain its freshness.
- Dough ferments faster in a warm humid kitchen. A colder kitchen (68 or below) slows down fermentation, which makes the bread making process take longer. Turn your oven to preheat to 350 degrees F, and set the timer for ONE MINUTE. Then, turn off the oven. It will be slightly warm and humid, and the perfect environment for fermentation. Then, set your dough into the OFF oven to rise.
- Life happens quickly, use a timer on your phone or the oven to keep track of the dough so you don’t forget!
- Get the right tools for the job! See below.
Tools I use to make Homemade Bread
Metal Bench Scraper – this is such a helpful tool for dividing and shaping dough, and cleaning your work space. The bench scraper is also super helpful in transferring ingredients from one place to another. Thank me later!
Proofing baskets – get at least 2 of these wicker baskets, and use them forever! They’re my favorite for that rustic boule.
Dough bowl Shower Caps – the shower cap eliminates the need for single use plastic, and it leaves enough room for the dough to rise. Best simple hack that has saved SOOO much plastic wrap.
Rubber Spatulas – you need them, you’ll use them 1,654,768 times day, make sure you get the good ones that will last.
KitchenAid Stand Mixer (click to SHOP)– although we’re not using it for this particular loaf, I use a mixer ALL THE TIME! This machine is a workhorse in my kitchen, and I use it for everything from bread baking, cinnamon rolls, cookies, to pies and tarts.
Substitutions
I get it! Once you open up Pandora’s box, you want to start experimenting with all different kinds of mix-ins for your bread. That’s what I love the most about this process – it is methodical but there is plenty of room for creativity.
With that being said, I have a post about adding mix-ins to your bread here. The sky is the limit, get creative, and tag me so I can see what you’re mixing up in your kitchen!
If you love it, Share it!
If you make this delicious No Knead Jalapeño Cheddar Artisan Bread, please tag me on Pinterest or Instagram so I can see! It’s my favorite thing to scroll through stories and see what you all are making.
And of course feel free to leave any questions, comments or reviews! This is the best place to reach me, and I’d love to hear from you <3
Without further ado, here is your ! Be sure to save this recipe and Pin It to your favorite Bread recipe Pinterest board!
Happy Baking xo LeAnne
The Recipe
No Knead Jalapeno Cheddar Artisan Bread
The only thing better than fresh artisan bread is No Knead Jalapeño Cheddar Artisan bread! Very simple to make, beyond delicious, and a huge crowd pleaser
Ingredients
- 4 cups, 480 g unbleached all purpose flour
- 2 teaspoons, 12 g kosher salt
- ½ teaspoon, 2 g dry active yeast
- 1-2 jalapeno peppers diced, leaving a few sliced into rings for the top
- 1 ½ cups, 130 g Kerrygold Aged Cheddar cheese grated
- 1 ⅔ cups, 390 g water room temperature
Instructions
- In a large mixing bowl, combine the flour, kosher salt, dry active yeast, diced jalapeno pepper, and grated Kerrygold cheddar cheese. Use a wooden spoon to mix. Add the water, and stir until blended, and a shaggy dough has formed.
- Cover the bowl with plastic wrap, then drape a kitchen towel over the plastic. Let the dough rest for 10-12 hours at room temperature, preferably around 70*F or less.
- Preheat the oven to 450*F. Place a dutch oven into the oven while it is preheating. The dutch oven should be heated for at least 15 minutes, once the oven reaches 450*F. The dough is ready when it is very puffy, jiggly, and the surface is full of air bubbles. Generously flour a work surface, and gently slide the dough out of the bowl, onto the floured surface. Use a rubber spatula around the bowl to release the sticky dough, to avoid disturbing the air bubbles in the dough as much as possible.
- Sprinkle the top of the dough lightly with flour, and gently fold the corners of the dough into the center. Flip the dough over, so the folds are facing down. Sprinkle a bit more flour, and gently shape the dough into a ball by pulling it towards you a few times. Don't knead, just a few times until a round shape is formed.
Place the dough, seam side down, on a sheet of parchment paper. Let it rest on the counter for 1 hour while the oven is preheating.
After 1 hour, use a sharp knife to quickly slash the top. Garnish the top with a few rings of sliced jalapeno.
- With oven mitts, carefully remove the preheated dutch oven from the oven, and place on a trivet or on the stove. Remove the lid. Pick up the parchment paper with the dough on it, and place it in the dutch oven. Put the lid back on, and bake for 25 minutes. Remove the lid, and bake for another 20-25 minutes until the crust is deeply golden brown. Let the bread cool completely on a baking rack, before slicing it, at least 2 hours.
The post No Knead Jalapeño Cheddar Artisan Bread first appeared on Lion’s Bread Blog.
Donna DAndrea says
I love your recipes. Can I make this with my sourdough starter? Thank you!
LeAnne says
Hi Donna! First, thank you so much for your kind words 🙂 Yes you can absolutely use sourdough starter or discard + yeast. Let me know how it turns out!
Nadia says
Can this dough be mixed in a mixer?
LeAnne says
Hi Nadia, You can use a mixer, but this loaf only requires enough mixing to bring the dough together. It is a no knead formulation, so once all of the flour is incorporated, cover the bowl and let it proof per the baking timeline in the recipe. Happy baking!