Start Here! a delicious loaf of sourdough bread for the beginner sourdough bread baker. Crispy crust, airy crumb, and a no-hassle simple method – what more could you ask for?
I’m so glad we found each other! Here, I’m teaching you how to make this foolproof rustic artisan loaf of 100% naturally fermented sourdough bread. Baking bread at home is extremely rewarding, satisfying and much healthier for you than store-bought bread.
THIS IS A JOURNEY, with ups and downs, and plenty of learning curves. It requires practice to get really good, as does everything. Take it easy on yourself, and just start. It doesn’t have to be perfect.
The method is straightforward, and I’m breaking down simple sourdough concepts to help you succeed and make delicious bread at home.
WANT MORE HOMEMADE BREAD RECIPES? CHECK OUT:
Cranberry Toasted Walnut Sourdough Bread
WHAT IS SOURDOUGH?
The backbone of homemade sourdough bread, is of course, the sourdough “starter”. A starter is a mix of flour and water that has been fermented over time, and contains a natural colony of yeast that leavens dough (makes it rise).
Before we start, if you don’t have a sourdough starter yet, you can easily make one! Here’s my full 7 day sourdough starter tutorial.
The Simplest Sourdough Bread Tutorial
STEP 1. Feed your sourdough starter 8-12 hours before you plan to start baking. We want to use the sourdough starter when it is fully active and bubbly, and has reached its “peak” rise in the jar.
STEP 2. Mix the dough. You’re going to dissolve the sourdough starter in warm water. Then, add the unbleached AP flour, and mix by hand, pinching the dough to incorporate the water and flour. I use a kitchen scale to measure out my ingredients by weight. This is much more precise, so get yourself a scale if you don’t have one already. Let this mixture rest for 20 minutes. Then add the salt, and mix by hand again, pinching the dough as you go.
STEP 3. Stretch and fold and the dough, every 45 minutes for 3-4 hours. This is a gentle process that replaces kneading. We’re building up the strength and structure of the gluten without deflated the dough. Gently lift up sides of the dough, and fold onto itself, until you work your way all the way around the dough. Dampen your hands with water slightly to prevent sticking. Let the dough rest for another 3-4 hours until it has almost doubled in size, is puffy, and there are bubbles on the surface. This is the dough’s 1st rise, called ‘bulk fermentation.”
STEP 4. Shape the dough. Gently turn the dough out onto a floured work surface. Pull the corners in to create a loose round shape. Let the pre-shapen dough rest for 15 minutes. Then pull the edges up an over and pinch them together, and roll the dough up to create a tighter ball. Place the dough ball seam-side up in a prepared 8″ round or oblong proofing basket/bread form.
At this point we want to keep our dough from drying out. You can either cover the proofing basket with a disposable shower cap (my favorite method) or loosely with a tea-towel, and place in a plastic bag, closed with a bag-clip.
STEP 5. Refrigerate the dough for 8-12 hours in warmer months in warmer kitchens. In the dead of winter (January in the northeast) I let my proof at room temperature on my kitchen counter.
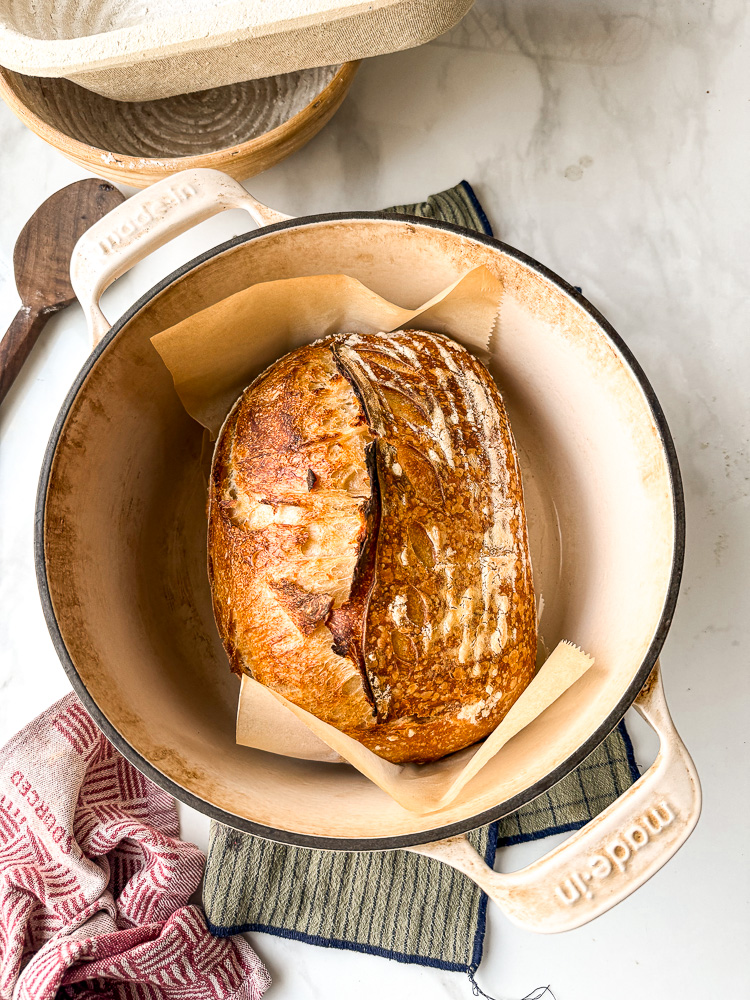
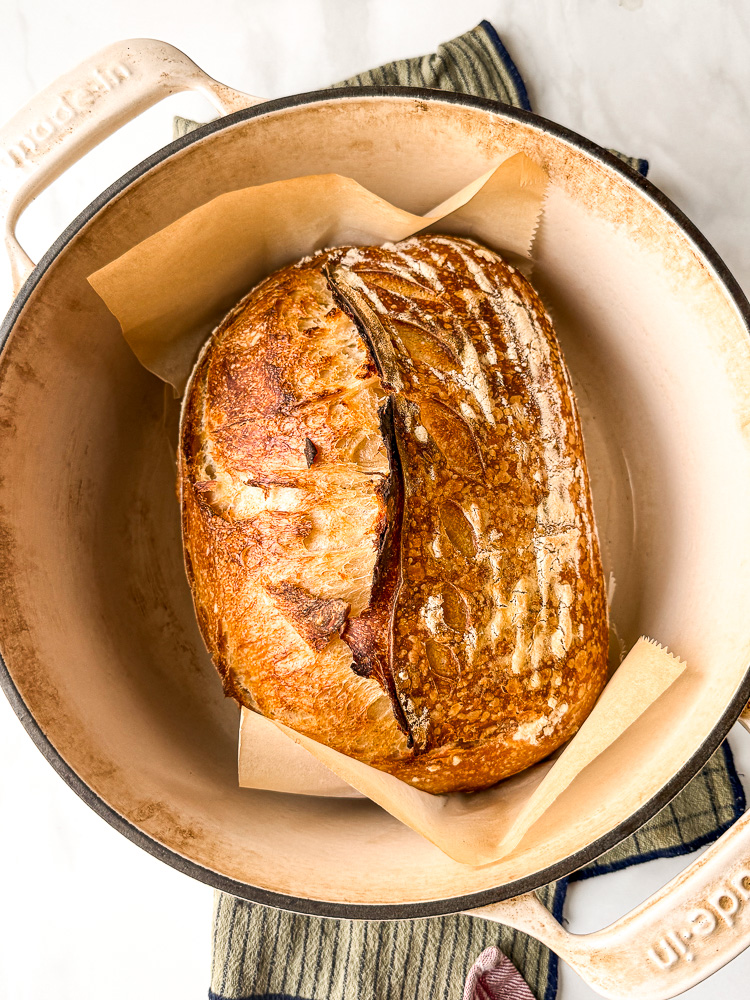
STEP 6. Bake bread! Remove the proofed dough from the fridge. Place a dutch oven on the middle rack of your oven. Preheat the oven to 450 degrees F. Cut a piece of parchment to fit in the bottom of the Dutch oven. Turn the dough out onto the parchment. Slash the top using a sharp knife or razor, to allow the steam to escape. Use oven mitts to carefully remove the hot Dutch oven from the oven. Place the loaf (with the parchment paper) into the pot. Place the lid on top. Bake for 25 minutes, then remove the lid of the pot, and bake for another 20 minutes.
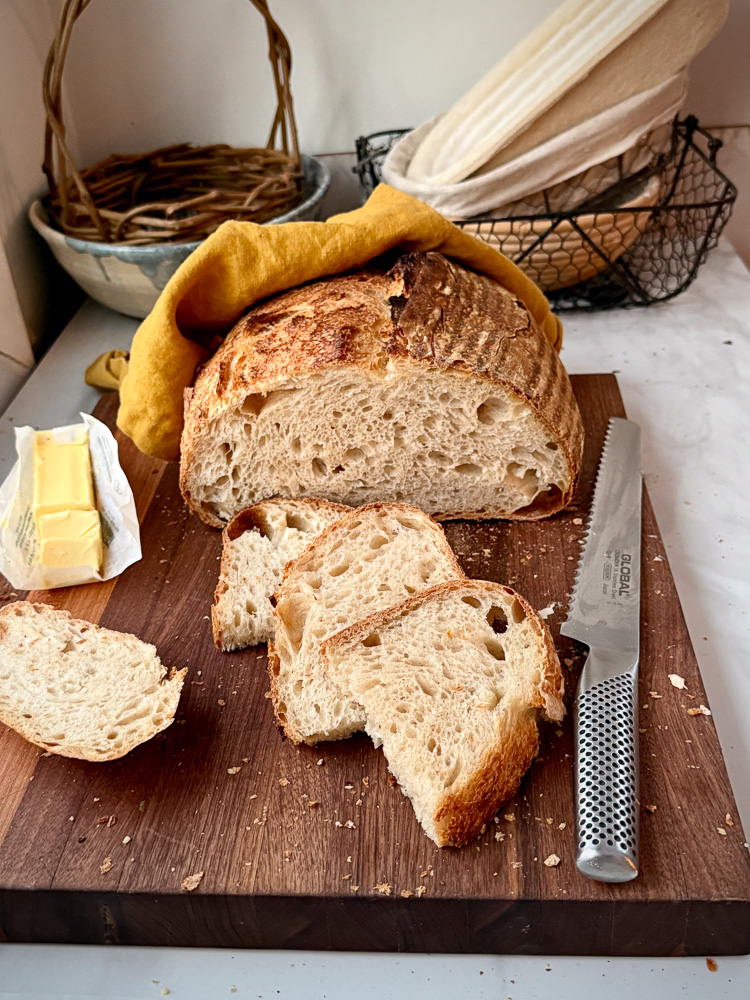
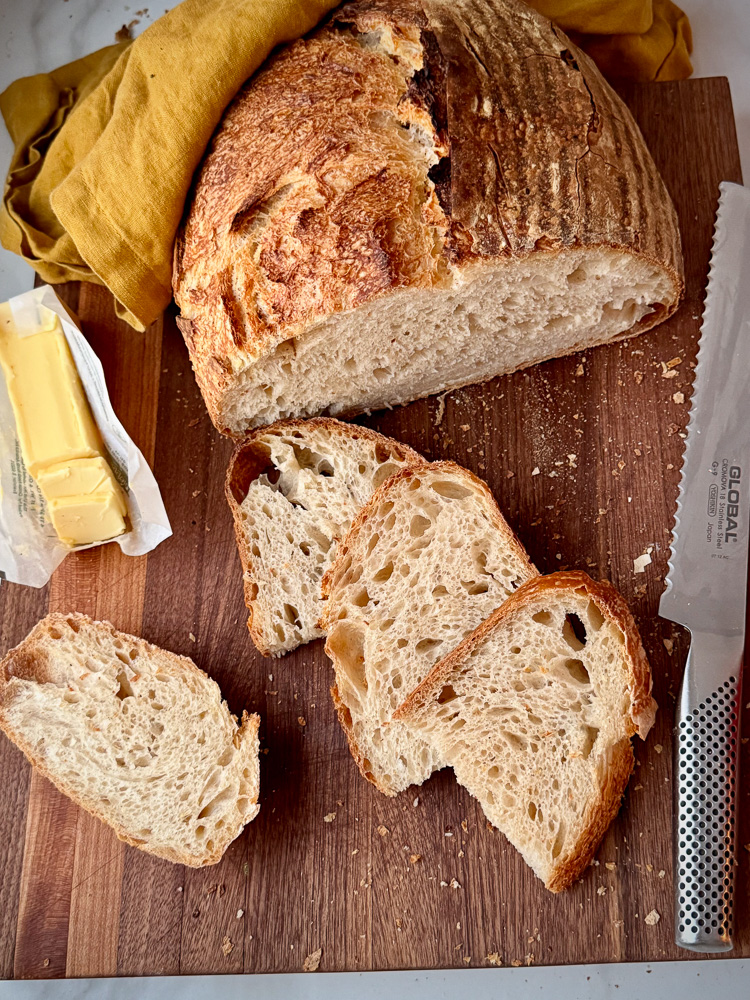
Allow the bread to cool completely, before slicing into it. I know this is hard (bc hello, freshly baked bread) but the bread actually continues to cook, while it cools, and slicing into it too early results in a gummy crumb (crumb is the inside of the bread).
baking the bread in a Dutch oven helps create the crispy crust and airy crumb
INGREDIENTS – they’re simple!
unbleached all purpose flour – I prefer to use unbleached all purpose flour made King Arthur Flour. I find that their flours always deliver consistent results, and the higher protein content in the AP helps with gluten development.
water – the temperature of the water is important. It should be warm room temperature, around 80 degrees F.
active sourdough starter – This recipe work best with an active sourdough starter that’s been fed 8-12 hours prior. That being said, you can also use sourdough discard but the fermentation timeline will probably take longer.
kosher salt – I always bake with kosher salt, I like the level of salinity and the clean flavor. My favorite brand is Morton’s, but if you’re using Diamond Crystal add another 2 grams of salt.
WEEKEND SOURDOUGH BREAD BAKING TIMELINE
I know what you’re thinking, “when am I ever going to have time to make this?!” The answer is simple. If you’re going to work 9-5 during the week, this is a weekend project. Here’s a sample baking schedule:
Friday night:
9pm: Feed your starter.
Saturday:
10am: Mix the dough, let rest for 20-30 minutes, then stretch and fold 4x every 45 minutes.
4-5pm: Shape the dough. Place the dough in proofing basket, refrigerate overnight. If your kitchen is very cool (like mine in the winter months in the Northeast, feel free to let it proof on the counter at room temperature – it’ll be fine!)
Sunday:
8am: Preheat oven (with Dutch oven inside.)
9am: Remove the loaf from the fridge, turn it out onto parchment paper, slash the top and Bake bread!
ESSENTIAL SOURDOUGH MAKING TOOLS
Here’s my complete guide Sourdough Bread Tools that every baker needs!
Danish Dough Whisk – this is a really handy tools that is specifically designed to mix bread dough by hand. I use it in the beginning stages of mixing, then mix with my hands.
Metal Bench Scraper – This is kitchen workhorse, and I use it almost daily to shape dough, cut dough, and move ingredients around the kitchen.
HOW TO STORE HOMEMADE SOURDOUGH BREAD
I like to store my homemade bread at room temperature, in an airtight container or bag for up to 3 days. After that, it’s best to slice the bread and freeze. It’s lovely to take the frozen slices out one at a time, and pop them straight into the toaster. They toast up perfectly and taste freshly baked.
If you loved this delicious Beginner Sourdough Bread recipe, I would truly appreciate it so much if you would give a star review! Also, be sure to snap a picture of your finished dish and share it with me on Instagram @lions.bread. It always makes my day seeing your creations!
For more delicious Lion’s Bread recipes, be sure to follow us on Pinterest, and Instagram.
As always I’m here for all your questions and comments. Be brave, you got this!
xo LeAnne
start here and enjoy the process! homemade sourdough bread is SO worth it!
THE RECIPE
Beginner Sourdough Bread
foolproof method for a delicious loaf of 100% naturally fermented homemade sourdough bread
Ingredients
- 230 gams sourdough starter
- 400 grams warm water around 85 degrees F
- 600 grams unbleached all purpose flour
- 14 grams kosher salt I use Morton's
Instructions
- STEP 1. Feed your sourdough starter 8-12 hours before you plan to start baking. We want to use the sourdough starter when it is fully active and bubbly, and has reached its "peak" rise in the jar.
STEP 2. Mix the dough. To a large mixing bowl, add the sourdough starter and the warmer water. Whisk to dissolve the sourdough starter in the warm water. Then, add the unbleached AP flour, and mix by hand, pinching the dough to incorporate the water and flour. I use a kitchen scale to measure out my ingredients by weight. This is much more precise, so get yourself a scale if you don’t have one already.
Cover the bowl, and let this mixture rest for 20 minutes. Then add the salt and a tablespoon of water and mix by hand again, pinching the dough as you go to incorporate the salt thoroughly.
STEP 3. Stretch and fold and the dough, every 45 minutes for 3-4 hours. This is a gentle process that replaces kneading. We’re building up the strength and structure of the gluten without deflating the dough.
Gently lift up sides of the dough, and fold onto itself, until you work your way all the way around the dough. Dampen your hands with water slightly to prevent sticking. Let the dough rest for another 3-4 hours until it has almost doubled in size, is puffy, and there are bubbles on the surface. This is the dough’s 1st rise, called ‘bulk fermentation.”
STEP 4. Shape the dough. Gently turn the dough out onto a lightly floured work surface. Pull the corners in to create a loose round shape. Let the pre-shapen dough rest for 15 minutes. Then pull the edges up an over and pinch them together, and roll the dough up to create a tighter ball. Place the dough ball seam-side up in a prepared 8″ round or oblong proofing basket/bread form.
- At this point we want to keep our dough from drying out. You can either cover the proofing basket with a disposable shower cap (my favorite method) or loosely with a tea-towel, and place in a plastic bag, closed with a bag-clip.
STEP 5. Refrigerate the dough for 12-24 hours in warmer months in warmer kitchens. In the dead of winter (January in the northeast) I let my dough proof at room temperature on my kitchen counter for 8-12 hours.
STEP 6. Bake bread! Remove the proofed dough from the fridge. Place a dutch oven on the middle rack of your oven. Preheat the oven to 450 degrees F. Cut a piece of parchment to fit in the bottom of the Dutch oven.
Turn the dough out onto the parchment. Slash the top using a sharp knife or razor, to allow the steam to escape. Use oven mitts to carefully remove the hot Dutch oven from the oven. Place the loaf (with the parchment paper) into the pot. Place the lid on top.
Bake for 25 minutes, then remove the lid of the pot, and bake for another 20 minutes.
- Allow the bread to cool completely, before slicing into it. I know this is hard (bc hello, freshly baked bread) but the bread actually continues to cook, while it cools, and slicing into it too early results in a gummy crumb (crumb is the inside of the bread).
The post Beginner Sourdough Bread first appeared Lion’s Bread Blog.
Bryn Gillow says
Love this!! Thank you, LeAnne!
Can the parchment paper be replaced by a silicone sling or are there drawbacks to that?
LeAnne says
of course! yes, a silicone sling you work as well here 🙂