The most gorgeous pistachio sponge layer cake filled with fresh raspberry buttercream and homemade raspberry jam
*this post may contain affiliate links and brand partnerships. This means that a small portion of the sale goes to me, at no extra cost to you. Thank you for supporting the brands that make Lion’s Bread possible.
Is this the perfect springtime cake?
Short answer, YES! The soft pistachio butter sponge is an actual dream, and is so light. My favorite part is that this is a pistachio cake that ACTUALLY tastes like pistachio, and not artificial flavors or colored green food dye.
There is nothing quite so dreamy as homemade fluffy buttercream, and adding fresh raspberry jam absolutely takes it to the next level. I love the balance of the raspberry buttercream with the brightness of the homemade raspberry jam. Don’t take my word for it, you HAVE to try it!
Ingredients for the gorgeous pistachio sponge
- shelled pistachios – I use unsalted shelled pistachios isn this cake because I want to control the amount of salt that goes into my cake, and the saltiness of nuts can vary A LOT. To keep your nuts and seeds fresh, I like to store mine in the fridge or freezer.
- unbleached all purpose flour – as with all of my bakes, I use King Arthur Baking flours. They are readily available in most grocery stores, and the are consistently producing professional quality results. The company is alway employee own and I love that!
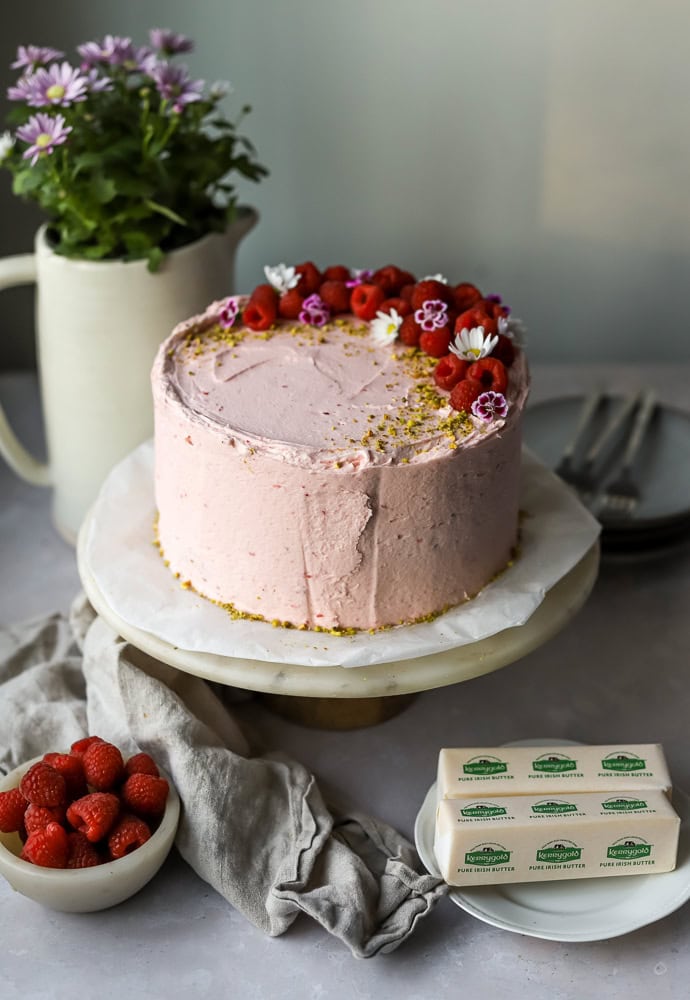
- salted butter – you’ve hear me say it before, but I’ll say it again: I use Kerrygold grass-fed butter always! In this Irish butter, there is a higher fat content, and it delivers the richest flavor. Truly the best!
- kosher salt – kosher salt is the cleanest salt to cook and bake with. I always use Morton’s because I like the level of salinity, but if you’re using Diamond Crystal, add an extra 1/4 teaspoon to the recipe.
- farm fresh eggs – large, pasture raised eggs are the way to go! You can often see the difference in the color of the yolks, where the richer more orange colored yolks come from pasture raised chickens. This means that the eggs are more nutrient dense, and the chickens have been able to forage naturally.
- buttermilk – the buttermilk adds a beautiful tenderness to the cake. I know there are hacks to make your own from milk and lemon juice, but if you can, try to get the real deal buttermilk – I always notice a difference in the texture.
- avocado oil – I love adding a bit of oil to this cake because it keeps it super moist and soft. The oil and butter work well together, where the butter adds richness and flavor, and the oil keeps the cake super soft.
- brown sugar and white sugar – a blend of both adds sweetness and the caramel notes from the brown sugar that I absolutely love.
Pistachio cake shouldn’t be dyed green. Period!
For a while now, I’ve been getting as far away as I possibly can from food dyes.
The hue of this pistachio is a beautiful natural light green color on its own. It doesn’t need anything extra, promise!
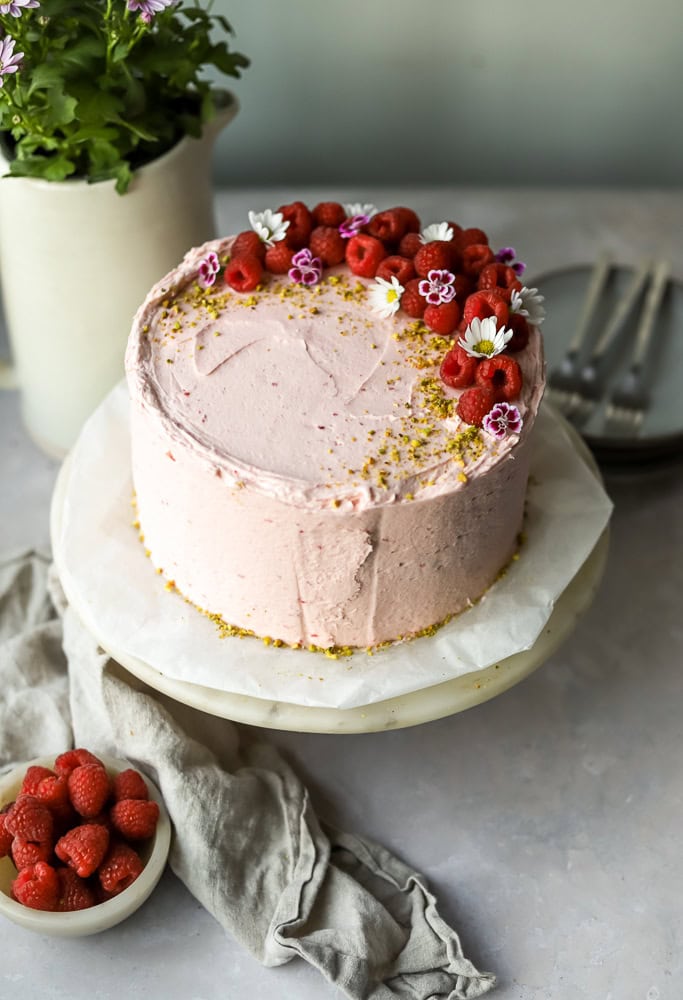
The same goes for the raspberry buttercream – the raspberries lend just enough color to the pale buttercream to make it a gorgeous pink color.
How to make a raspberry pistachio layer cake
- Preheat the oven to 350 degrees F. Line 3 8-inch round cake pans with parchment circle on the bottom of each. Spray the sides of each pan with nonstick cooking spray. Set aside.
- Make the cake: To a large mixing bowl, add the all-purpose flour, kosher salt, baking powder, and baking soda. Whisk to combine, set aside.
- To the bowl of a stand mixer fitted with the paddle attachment, add the Kerrygold salted butter, granulated sugar, and brown sugar. Beat until fluffy and pale in color, 3-4 minutes. Add the eggs, one at a time, incorporating each one before adding the next. Slowly stream in the avocado oil.
- With the mixer on low, add ⅓ of the flour mixture to the bowl. Next, add ½ of the buttermilk to the mixer. Alternate with another ⅓ of the flour mixture, mix, then the remainder of the buttermilk, and finally the flour. Mix until just combined. Be sure to scrape the sides and the bottom of themixer with a rubber spatula to ensure that all of the flour and butter is combined. Add equal amounts of cake batter to the 3 prepared pans. Bake for 28-30 minutes, rotating the pans halfway through to ensure an even bake. The tops should be lightly golden brown, and a toothpick should come out clean and warm.
- Allow the cakes to cool to room temperature. Place them in the fridge to speed up the cooling process. Run a sharp paring knife around the perimeter of each cake, and invert each cake onto a piece of plastic wrap. Wrap the layer in plastic, and freeze for at least 1 hour. Assembling the cake when the layers are cold is much easier! Repeat the same process with the remaining 2 layers.
Easy Homemade Raspberry Jam/Filling
Meanwhile, make the raspberry jam. Add the fresh raspberries, granulated sugar, and salt to a small saucepan. Cook over medium heat for 8 minutes, stirring occasionally and breaking up any larger pieces of berries. Reduce the heat to low and continue cooking for another 5-7 minutes until the jam has thickened. Set aside to cool completely.
The best Fresh Raspberry Buttercream recipe
- Make the raspberry buttercream: To the bowl of the stand mixer fitted with the paddle attachment, add the soft room temperature butter. Beat for 1 minute on medium. Add 2 cups of the powdered sugar, mix on low, and gradually add the rest of the powdered sugar.
- Slowly stream in the milk (or buttermilk) while beating the buttercream on medium/low. Add the 2 tablespoons of raspberry jam.
- Beat for another 2 minutes until the mixture is light, fluffy, and a pale pink color.
The best way to assemble a layer cake
Once your cake layers are baked and cooled, wrap them individually in plastic wrap or parchment paper, and freeze them for at least 3-4 hours. It’s much easier to work with cold cake because it has fewer crumbs and holds together better.
Use a lazy Susan turntable if possible. Being able to easily spin the cake around while you assemble ensures that the layers are lined up evenly, and everything is straight.
Put your serving plate or cake board on the turntable, then put a dollop of buttercream in the center to act like glue. Place the first layer down, flat side up. Next add your buttercream, level and spread it our evenly with an offset spatula, and create a shallow indentation to layer in the homemade raspberry jam.
Place the next layer on top, and repeat!
How to garnish desserts with edible flowers
Little backstory: my mom has been garnishing with edible flowers and greenery for my WHOLE LIFE. She calls it “garnish from the garden.” When we moved out to the country, I immediately wanted to start planting flowers beds and our organic vegetable garden.
Gardening is a true passion of mine, and I always incorporate plenty of edible flowers when planning my gardener the year.
Some of my favorite to pull from are: pansies, violas, roses, Dianthus (as seen not his cake), nasturtiums, chamomile, calendula, marigolds, lavender, and borage. Always run a quick google search if you’re unsure.
Want to candy flower petals?? Check out this post for candied violets to top a beautiful chocolate tart.
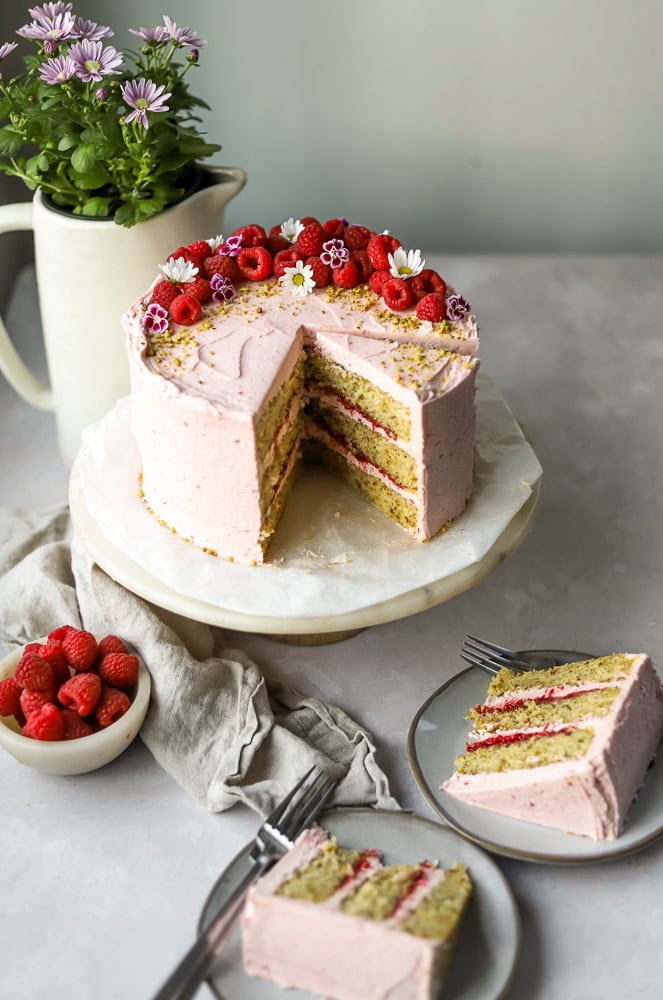
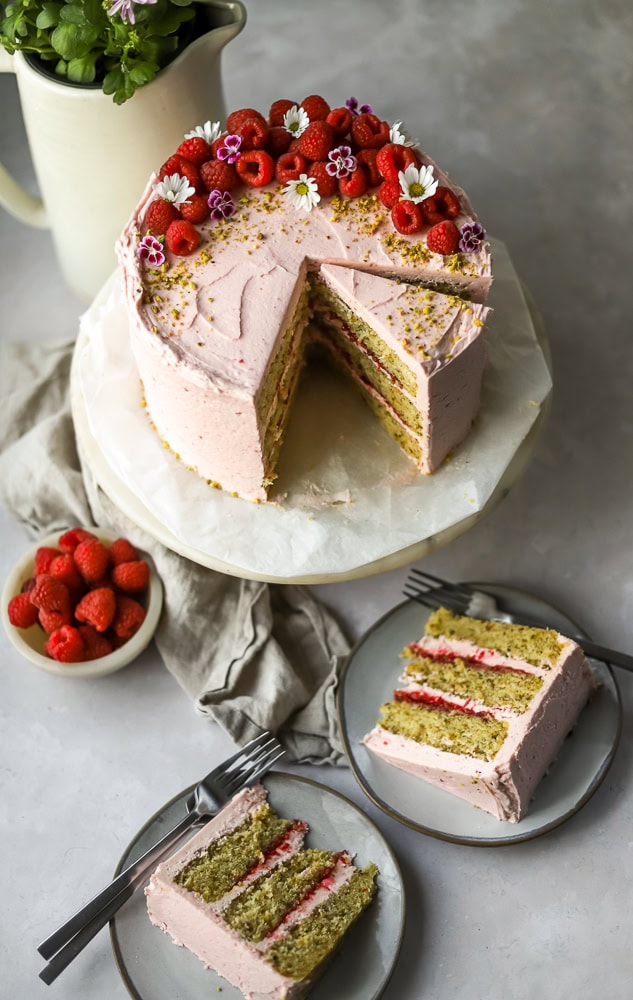
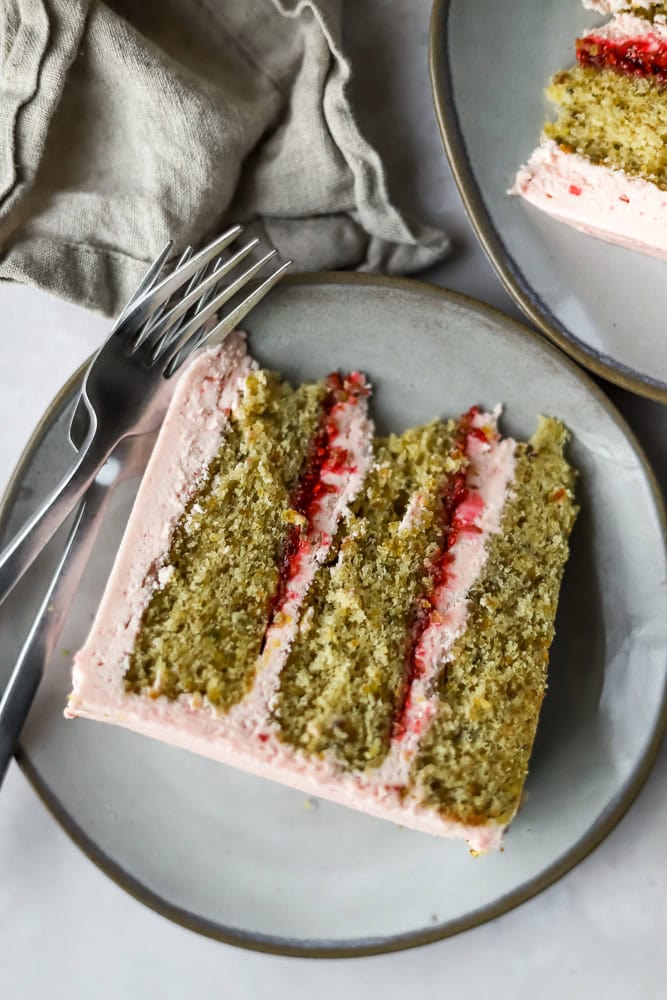
look at those gorgeous layers!
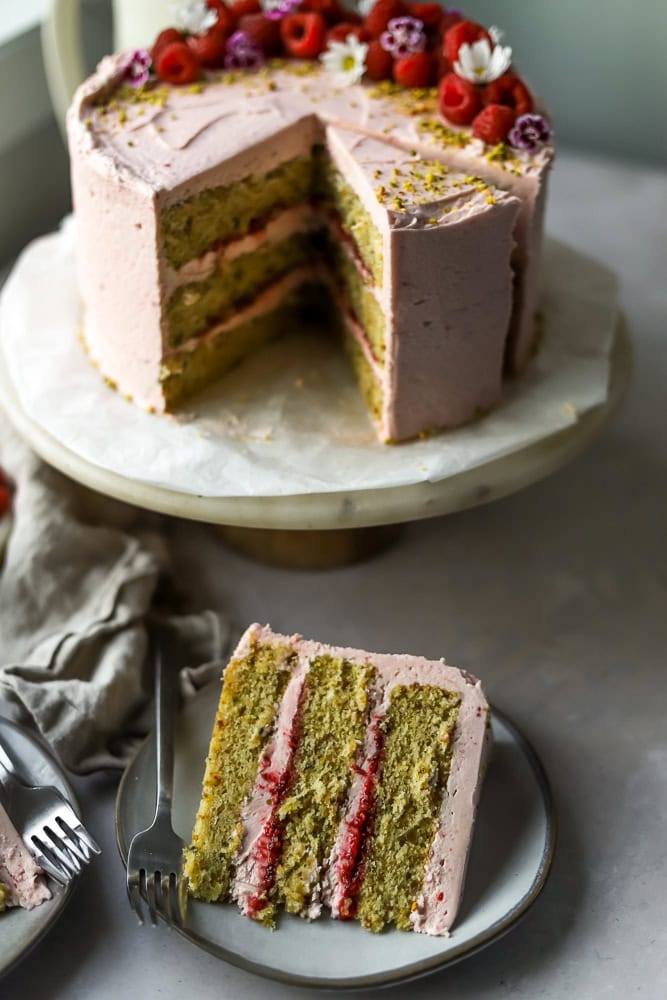
see then natural green hue in the pistachio sponge?? chef’s kiss – xx
How to store leftover Cake
Chances are, you may a few pieces of cake leftover because this 3-layer cake is generous! Store leftovers in an airtight container in the fridge for up to 4 days (but I’m sure they won’t last that long!).
More beautiful cake recipes
Fresh Peach and Blackberry Cake
Pavlova with Berries and Cream
Pear and Almond Brown Butter Cake
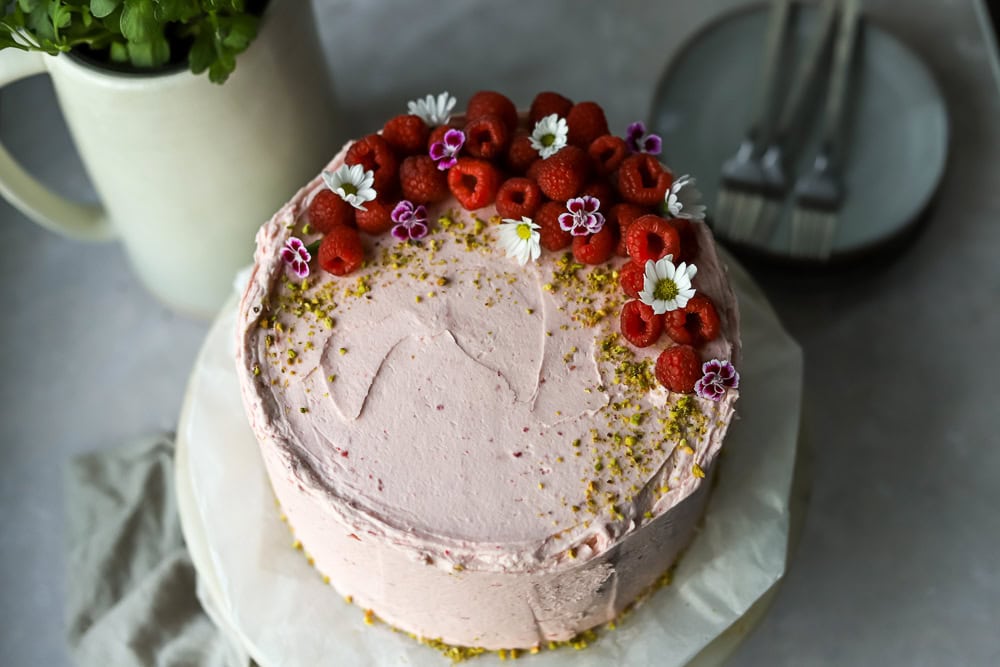
top your cakes with edible flowers, trust me!
bon appétit!
If you loved this delicious Raspberry Pistachio Layer Cake recipe, I would truly appreciate it so much if you would give a star review and comment! Also, be sure to snap a picture of your finished dish and share it with me on Instagram @lions.bread. It always makes my day seeing your creations!
For more delicious Lion’s Bread recipes, be sure to follow us on Pinterest, and Instagram.
Raspberry Pistachio Layer Cake
The most gorgeous pistachio layer cake filled with raspberry buttercream and homemade raspberry jam
Ingredients
Homemade Raspberry Jam
- 2 pints fresh raspberries
- ½ cup granulated sugar 50 g
- pinch of kosher salt
- 1 tablespoon fresh lemon juice
Pistachio Cake
- 2 cups shelled unsalted pistachios blended into a fine powder/flour, should equal 1 ½ cups ground pistachios, reserve 1-2 tablespoons for garnish
- 2 cups unbleached all purpose flour 240 g
- 1 teaspoon kosher salt
- 2 teaspoons baking powder
- ½ teaspoon baking soda
- 12 tablespoons Kerrygold Salted Butter at room temperature, 168 g
- 1 ½ teaspoons pure vanilla extract
- 3 large eggs at room temperature
- ¼ cup avocado oil 54 g
- 1 ½ cups granulated sugar 300 g
- ¼ cup brown sugar packed, 50 g
- 1 cup buttermilk or whole milk at room temperature, 240 g
Raspberry Buttercream
- 20 tablespoons salted butter very soft room temperature, 282 g
- 2 tablespoons of the Raspberry Jam above
- 6 cups powdered sugar sifted
- 2-3 tablespoons whole milk or buttermilk
- Generous pinch of kosher salt
- 1 pint raspberries for garnish
- Edible flowers for garnish
Instructions
- Preheat the oven to 350 degrees F. Line 3 8-inch round cake pans with parchment circle on the bottom of each. Spray the sides of each pan with nonstick cooking spray. Set aside.
- Make the cake: To a large mixing bowl, add the all purpose flour, kosher salt, baking powder, and baking soda. Whisk to combine, set aside.
- To the bowl of a stand mixer fitted with the paddle attachment, add the butter, granulated sugar, and brown sugar. Beat until fluffy and pale in color, 3-4 minutes. Add the eggs, one at a time, incorporating each one before adding the next. Slowly stream in the avocado oil.
- With the mixer on low, add ⅓ of the flour mixture to the bowl. Next, add ½ of the buttermilk to the mixer. Alternate with another ⅓ of the flour mixture, mix, then the remainder of the buttermilk, and finally the flour. Mix until just combined. Be sure to scrape the sides and the bottom of themixer with a rubber spatula to ensure that all of the flour and butter is combined. Add equal amounts of cake batter to the 3 prepared pans. Bake for 28-30 minutes, rotating the pans halfway through to ensure an even bake. The tops should be lightly golden brown, and a toothpick should come out clean and warm.
- Allow the cakes to cool to room temperature. Place them in the fridge to speed up the cooling process. Run a sharp paring knife around the perimeter of each cake, and invert each cake onto a piece of plastic wrap. Wrap the layer in plastic, and freeze for at least 1 hour. Assembling the cake when the layers are cold is much easier! Repeat the same process with the remaining 2 layers.
- Meanwhile, make the raspberry jam. Add the fresh raspberries, granulated sugar, and salt to a small saucepan. Cook over medium heat for 8 minutes, stirring occasionally and breaking up any larger pieces of berries. Reduce the heat to low, and continue cooking for another 5-7 minutes until the jam has thickened. Set aside to cool completely.
- Make the raspberry buttercream: To the bowl of the stand mixer fitted with the paddle attachment, add the soft room temperature butter. Beat for 1 minute on medium. Add 2 cups of the powdered sugar, mix on low, and gradually add the rest of the powdered sugar. Slowly stream in the milk (or buttermilk) while beating the buttercream on medium/low. Add the 2 tablespoons of raspberry jam. Beat for another 2 minutes until the mixture is light, fluffy, and a pale pink color.
- Assemble the cake: Place your first layer of chilled/frozen cake on a serving plate, cake stand, or turntable. Add roughly ⅓ cup of the raspberry buttercream to the top, and use an offset spatula to smooth it out into an even layer. Add 2 generous tablespoons of the raspberry jam on top, and use the spatula to spread it out evenly on top of the buttercream, leaving a 1-inch border from the edge so that jam doesn’t spill out the sides. Add the next layer on top, and repeat the process. Add the final layer, then smooth the rest of the frosting over the top and sides. If your cake is starting to thaw and get “crumby,” smooth on a very thin layer of buttercream to cover the crumbs. Place the cake in the fridge for 10 minutes to set the buttercream. Then, add another thin layer for a smoother look. Decorate the top with fresh raspberries, edible flours, and the reserved crushed pistachios.
The post Raspberry Pistachio Layer Cake first appeared on Lion’s Bread Blog