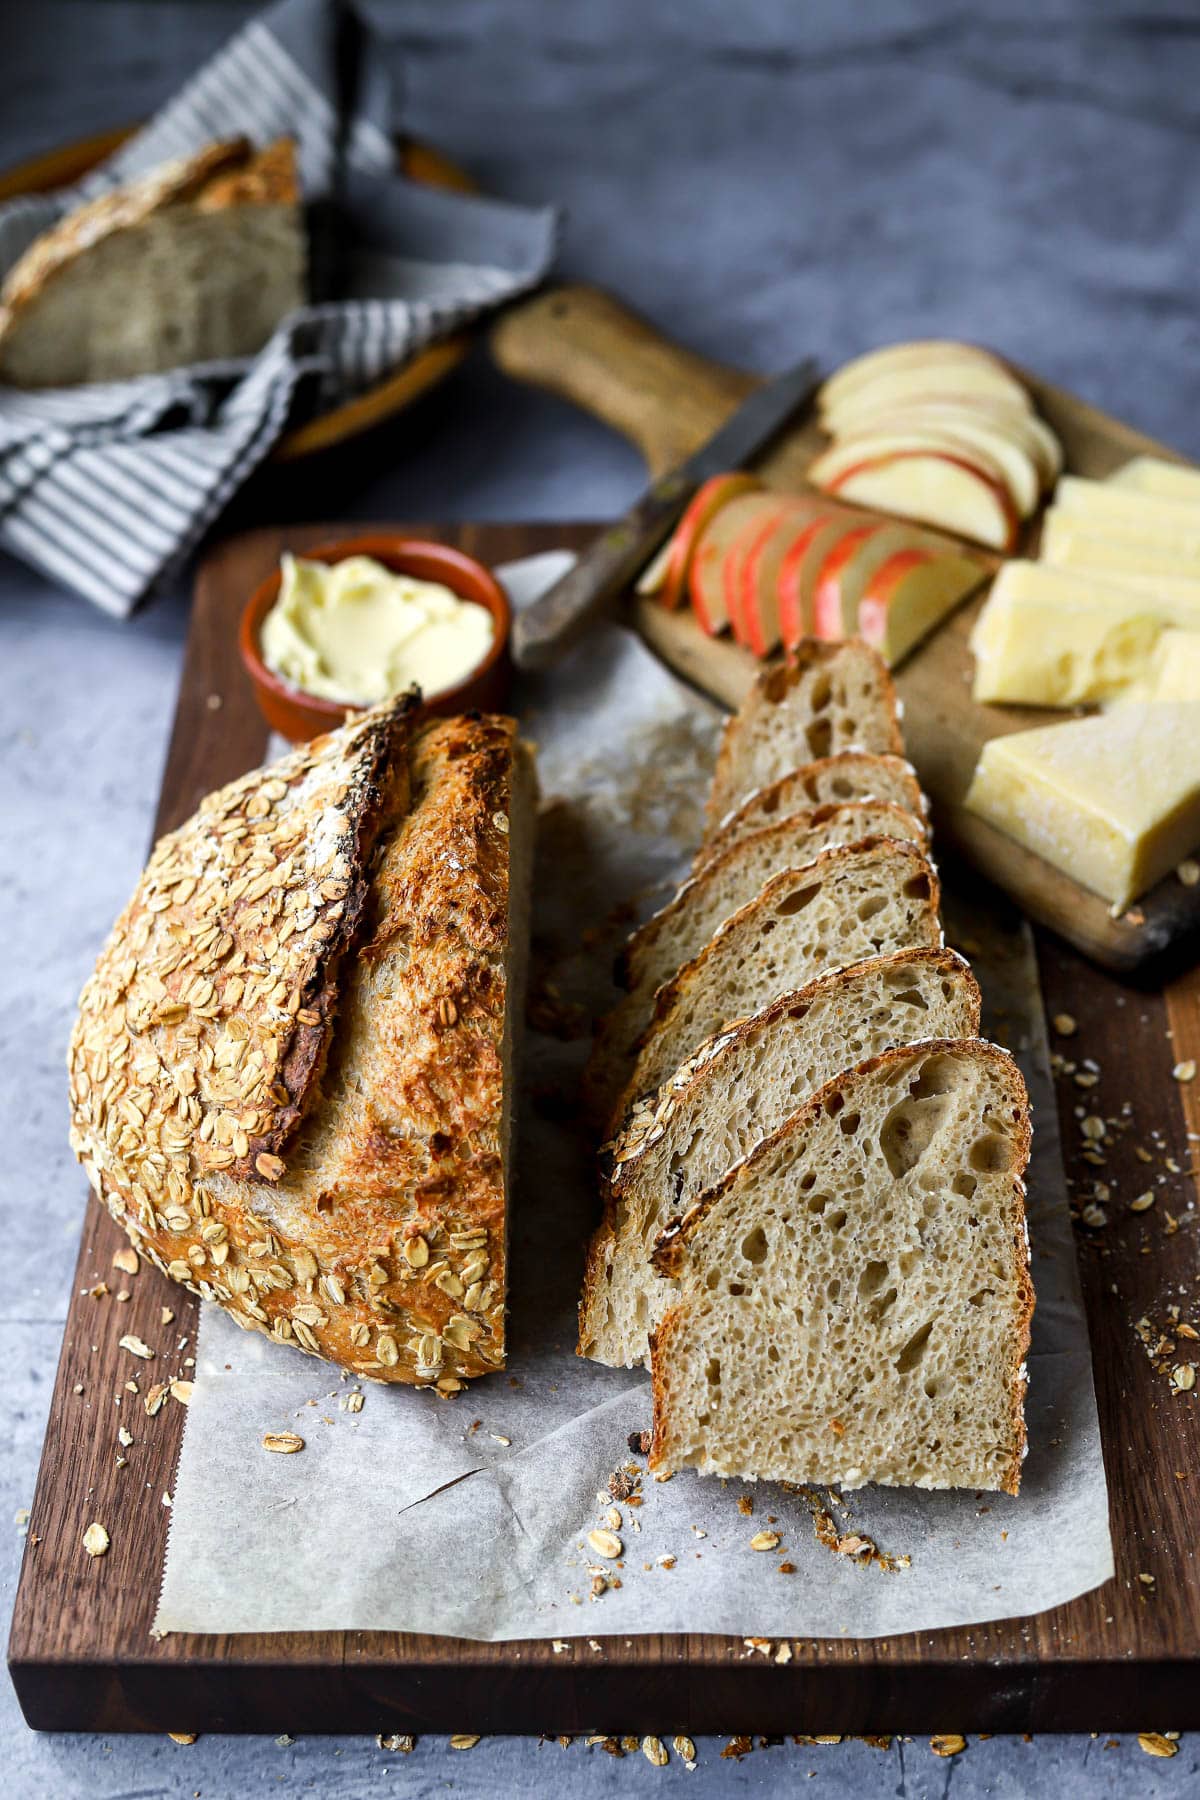
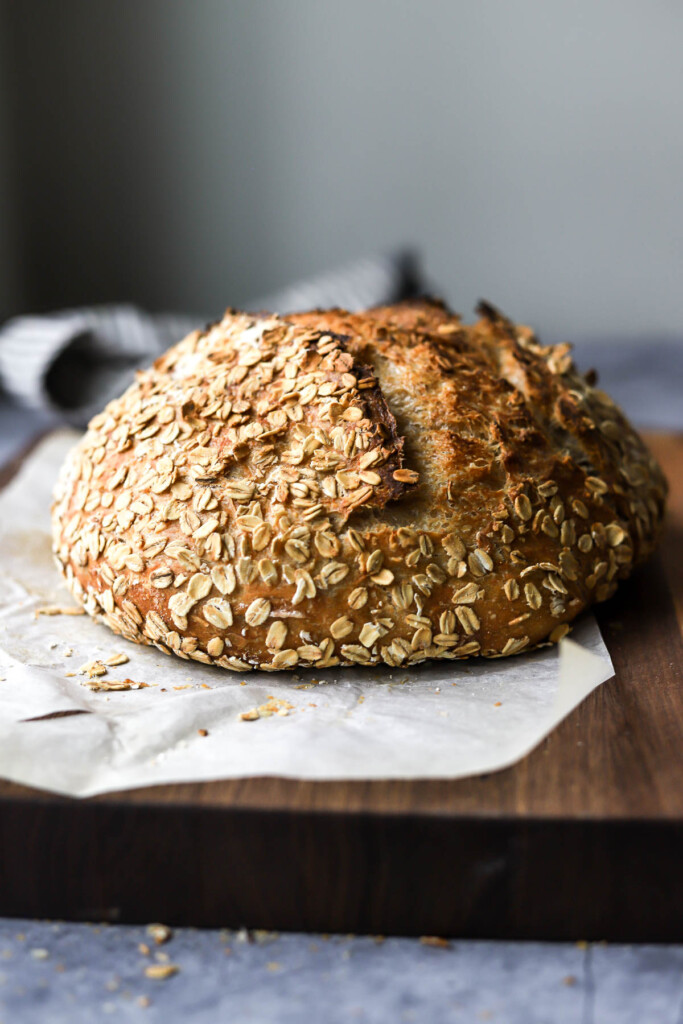
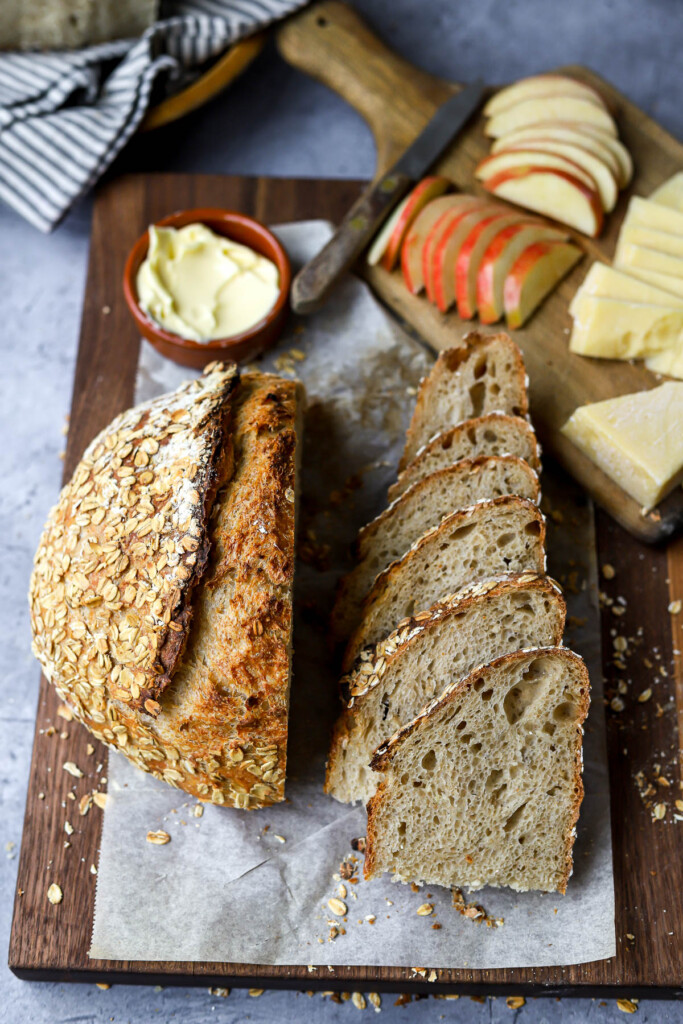
Super wholesome loaf of Sourdough bread made with cooked oatmeal porridge and coated in rolled oats
How to make Homemade Bread
Oatmeal Sourdough is simple to make and a great “everyday bread.” In this recipe, as is the case with most recipes on my site, you won’t need any fancy equipment or tools. With just a few basic items, you can create delicious artisan bread at home (see my list of tools below).
We don’t suffer from any gluten intolerance, and I think making my own bread with high quality, minimal ingredients has a lot to do with that. It’s a very sensory/meditative process, and it makes me nostalgic for a simpler time – before corporations took over the farming and food industry and before bread had a list of 20+ ingredients on the supermarket shelves.
Understanding Fermentation
Perhaps the most important element of bread making is knowing how to “read the dough” and understanding the fermentation process through physical signs. When the dough is bubbly, puffy and jiggly, it is just right, and ready to be shaped and baked.
If the dough is flat and watery, it is likely over proofed (you let is rise too long).
Or, if the dough is flat without any signs of bubble/fermentation, it is likely under proofed (needs more time).
If you want fluffy airy homemade artisan bread, it will likely take plenty of trial and error. The temperature of the kitchen can speed up or slow down the fermentation process greatly. A hot kitchen (70+ degrees F) speeds up fermentation, where a colder kitchen (>70 Degrees) can slow the fermentation process down.
Want more simple and delicious homemade bread recipes? Check out:
Harvest bread made with Poolish
INgredients
- old fashioned rolled oats – be sure to use Old fashioned Rolled oats for this recipe. They maintain their shape and chewy texture which contributes a lot to the crumb of the bread.
- unbleached all purpose flour – I use unbleached all purpose flour from King Arthur Baking Company. It has a higher protein content than most AP flours. You could use bread flour if that’s what you have.
- whole wheat flour – go with a nice whole grain flour here. I’m using wheat, but you can substitute rye, spelt, or buckwheat.
- yeast – I use dry active yeast in this recipe, and my favorite brand is Red Star Yeast for its consistent and professional results. I mix the dry active yeast with the warm water to activate it, or “wake it up.” Also, I always store my yeast in the fridge to prolong its shelf life.
- kosher salt – I use Morton’s kosher salt in all of my bread recipes. If you are using Diamond Crystal, add another 4 grams of salt.
- water – I use water that’s about 85 degrees F, slightly warmer than room temperature. It’s important that the water is not too hot, otherwise it will kill the yeast, and your rolls won’t rise properly. A lot of the tap water in the US is treated with chemicals like fluoride and chlorine, which can negatively affect the rise of our dough. To avoid this, I prefer to use filtered spring water for all of my bread baking.
Baking Timeline
8:00am – make the oatmeal porridge
9:00am – Mix the dough
9:30am – Stretch and Fold #1
10am – Stretch and Fold #2
10:30am – Stretch and Fold #3, bulk ferment for 3 hours
2:00pm – Shape the dough, let it proof for 2 hours
3:00pm – preheat oven with Dutch oven
4:30pm – Bake!
*Alternative overnight cold proof option in the notes below the recipe!
TOOLS I USE:
- Large mixing bowl – one the most FAQ, this is my favorite bowl for mixing dough!
- kitchen scale – this is an absolutely necessary tool for baking bread. If you want consistent, professional results, weighing your ingredients with a scale is a must.
- Danish dough whisk – this is a quirky looking tool that is actually very useful for mixing up bread dough. If you make bread often, I highly recommend getting one!
- small spray bottle – This basic little tool comes in handy for adding just a little extra shot of extra steam to the oven. Sometimes I spray the tops of the rolls before I place them in the oven to get a blistered crackly top.
- bread lame for slashing dough – there are many styles of bread lames, and ultimately choose the one that is most comfortable in your hand. I love this round style, and I’ve tried almost every style out there.
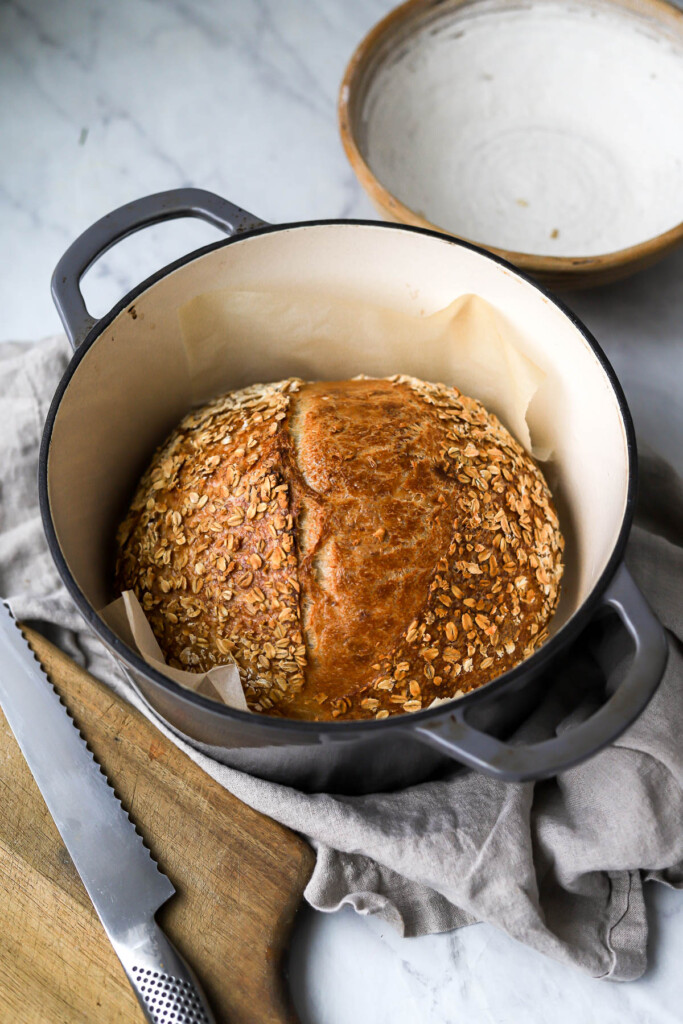
- Dutch oven – baking bread in a Dutch oven is the secret for homemade artisan bread. The Dutch oven traps the steam while the dough is baking which allows the bread to rise to its peak while keeping the outer crust soft. Then, halfway through the baking time, remove the lid to allow the crust to crisp up. I love the Lodge Dutch oven linked here for its consistent results and amazing quality.
HOW DO YOU MAKE BREAD CRISPY and CRUSTY?
There are three main factors to making really great crusty bread. First, you have to get the hydration level just right. This means the water to flour ratio has to be balanced. If the dough is too wet, for example, it will be very difficult to get a crispy, shatteringly thin delicious crust. The crust will like be thick and tough.
Second, use steam to bake! For this homemade olive bread, we bake it in an enclosed Dutch oven, which traps in the steam while the bread bakes. Adding moisture and steam to the oven keeps the outer crust of the bread soft, which allows the interior of the bread to rise to its full potential before the outer crust hardens.
After the bread has rise fully with the lid of the Dutch oven on, I remove the lid, and let the crust crisp up for another 20 minutes or so.
HOW TO STORE
This delicious Oatmeal Sourdough Bread is best stored at room temperature for up to 3 days. Or, place it in an airtight bag, and freeze them for up to 1 month.
I can’t wait to see your take on this Oatmeal Sourdough Bread. Remember to tag me @lions.bread in your pics so I can all of the delicious things you’re making from my site. I love seeing my recipes come to life in your kitchens!
Want to save this recipe for later? Just click on any picture, and tap the “Pin It” button to save it to your favorite Pinterest Board!
Love this recipe? Be sure to check out: Everyday Artisan Bread, Same-Day Country Loaf, and Lion’s Bread Original Challah
Oatmeal Sourdough Recipe: Did you make this recipe? Rate and comment below, I love hearing from you!
Oatmeal Sourdough Bread
wholesome loaf of oat porridge artisan bread coated in oats
Ingredients
- 275 g water room temperature, filtered
- 100 g cooked oat porridge, cooked according to package instructions cooled to room temperature
- 1 teaspoon dry active yeast
- 100 g sourdough starter discard or fully ripe
- 325 g unbleached all purpose flour
- 75 g whole wheat flour
- 50 g old fashioned rolled oats, uncooked plus more for coating the crust
- 12 g kosher salt
Instructions
Mix the dough: In a large mixing bowl, combine the water, dry active yeast, cooked oats, and sourdough starter. Use your fingers to swish it all together, and dissolve the yeast, oats and starter into the water.
Add the unbleached all purpose flour, whole wheat flour, salt, and uncooked oats to the mixture. Use your hands to mix the dough together, pinch and squeezing until all of the ingredients come together in a sticky dough.
Scrape down the sides of the bowl with a rubber spatula, and scrape any dough off of your hands as well. Cover the bowl with a clean kitchen towel, and let the dough rest for 20 minutes.
Stretch and fold: Now you stretch and fold the dough in the bowl, in order to help develop the gluten and strengthen the dough to trap the fermented gases, creating beautiful air pockets in your loaf. Dampen your hands with water to prevent the dough from sticking and gently lift up one corner of the dough, and fold it to the center. You shouldn't be stretching so high that the dough tears. Rotate the bowl and repeat 3 more times until you have worked your way around the dough. Repeat this process every 35 minutes for 1.5 hours. Be extra gentle towards the end , so you don't deflate the dough.
Bulk fermentation: Cover the bowl with plastic wrap or a clean shower cap and let the dough proof at room temperature for 3-4 hours until it is puffy and jiggly. If you don't see any signs of fermentation (bubbles, puffiness). let the dough ferment for up 1-2 more hours.
Shape the dough: sprinkle your clean work surface well with flour. Pour the dough out onto the work surface. Use your hands to gently stretch the dough out into a square shape. One at a time, bring all 4 corners into the center of the dough. Flip the dough over, so it is seam side down, to rest on the counter for 5 minutes. This is called a "bench rest."
Flip the dough over once more, and bring all 4 corners into the center again to create a tighter boule shape, with more tension. Pinch the corners together.
Flour your proofing basket well. Pour about 1 cup of uncooked oats into a shallow dish. Spray the top of dough with water, and roll it in the oats to coat the crust. Spray the bottom with water, and roll it to coat the entire crust with oats. Place the dough in the prepared proofing basket. Cover the dough with a dry clean kitchen towel, and let the dough proof for another 1.5-2 hours at room temperature.
Another option: you can place the proofing basket in a plastic grocery bag, twist it shut, and let the dough do a longer cold ferment in the fridge overnight. The next morning, take it out of the fridge, and let it rest for an hour while the oven and Dutch oven preheat.
Bake: Meanwhile place a 5-6 quart Dutch oven on the middle rack of your oven. Preheat the oven to 450°F for at least 45 minutes. Invert the proofed dough onto a piece of parchment paper. Slash the top with a sharp chef's knife or lame. This creates a controlled way for the steam inside the bread to release.
Carefully remove the hot Dutch oven from the oven, and remove the lid. Use the parchment paper as a sling, and lower the loaf into the Dutch oven. Place the lid back on. Return the pot to the oven and bake for 25 minutes with the lid on.
Remove the lid, and bake for another 25 minutes uncovered.
Allow the bread to cool completely on a rack before slicing. Enjoy!
Recipe Notes
Long cold ferment option:
After you have shaped the dough and placed it in the proofing basket, you can place the proofing basket in a plastic grocery bag, twist it shut, and let the dough do a longer cold ferment in the fridge overnight. The next morning, take it out of the fridge, and let it rest for an hour while the oven and Dutch oven preheat. Then bake as instructed.
The post Oatmeal Sourdough Bread first appeared on Lion’s Bread Blog.
Audrey says
The recipe doesn’t specify when to add the actual porridge? Do you add it to the starter mixture?
LeAnne says
Corrected that, thank you! The oats are added with the sourdough starter and yeast. Thanks!
Cotty says
Hello
Looks gorgeous
When do you add tge cooked (cooled) oats?
LeAnne says
Great catch! They are added with the sourdough starter and yeast. Corrected that now, thanks!
D says
If you use active starter,can you omit the yeast?
LeAnne says
Yes, you absolutely can omit the yeast. The bulk fermentation and proofing time will belonged of course, so look for the tell-tale signs of proper fermentation – puffy, jiggly dough that has bubbles and a domed top.
Riley says
Hi! Can’t wait to make this recipe! When do the cooked oats/porridge get added in? Thanks 🙂
LeAnne says
Hi Riley,
I edited the recipe to show when the oats get added. Thanks for catching that!
-LeAnne
Janna says
Hi! Do you cook the oatmeal with water or with milk? Thanks!
LeAnne says
Great question, I usually use water, but you could definitely use milk or any kind of nut milk that you love!
Ally says
Is It possible to make this with solely sourdough starter, rather than adding the extra tsp of active dry yeast?
LeAnne says
Hi Ally,
You absolutely can omit the yeast. The bulk fermentation and the proofing times will be longer, but if you bake regularly with sourdough, you already know that 🙂
Tressa says
Could this be made into a sandwich loaf? I have a large (13x4x4) Pullman pan I would like to use for it. Thank you!
LeAnne says
Absolutely! This oatmeal loaf would make incredible sandwich bread. Let me know what you think if you try it!
Siara says
How many dry oats do you use to make 100g of cooked oats?
LeAnne says
Hi Siara,
It is about 1/4 cup of dry oats. I usually make a bigger batch of oatmeal for breakfast and just weigh out the cooked oats I need for this recipe.
-LeAnne