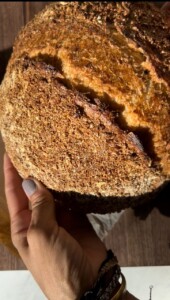
a hearty, super wholesome loaf of artisan wheat and bran bread made with a pre-ferment called a “poolish”
This is the perfect homemade bread recipe for someone who wants to begin their artisan bread baking journey! I love adding whole wheat flour and wheat bran to this loaf of bread for a really nutty, wholesome flavor. Feel free to substitute your favorite flours, like a mix of spelt or buckwheat would be really delicious too.
Want more Homemade bread recipes? Check out:
How to Make a Sourdough Starter
What is a Poolish?
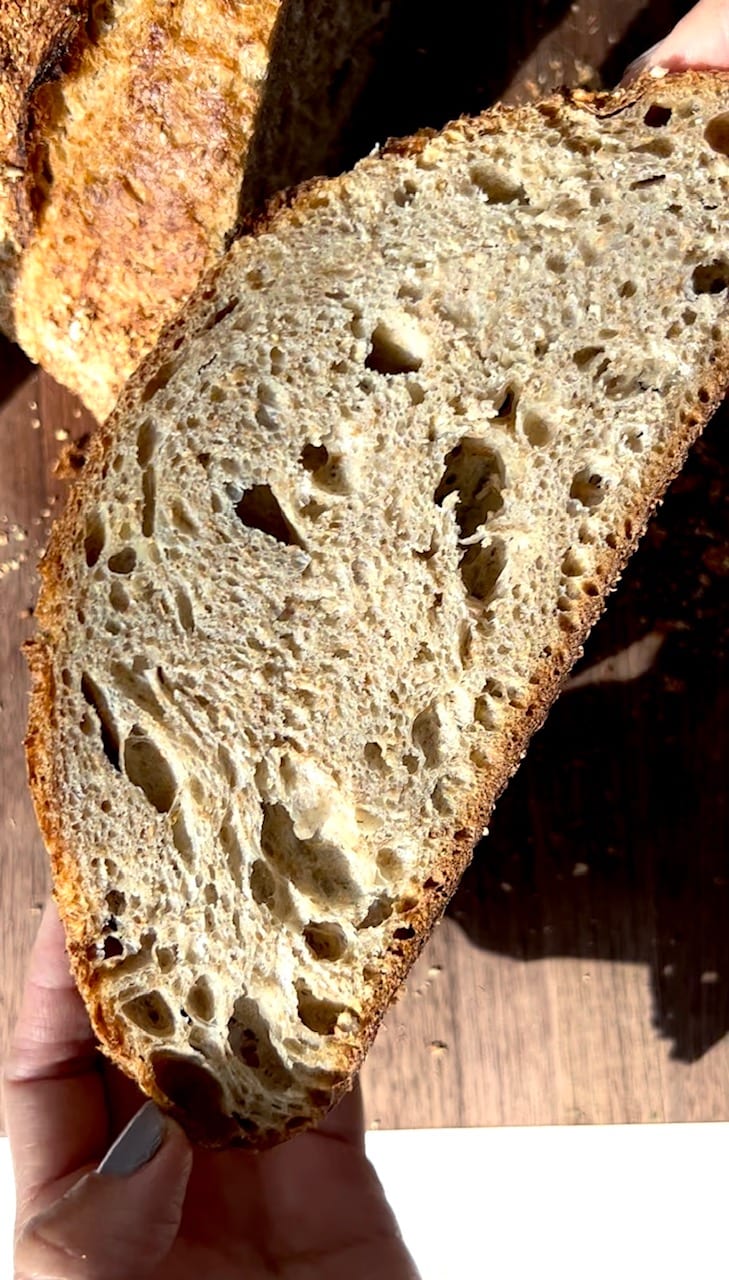
Why should you add a Poolish to your homemade bread? A poolish will add really nice, complex flavor to your bread, and help you achieve a light and airy open crumb. The flavor isn’t quite as tangy or sour as a traditional sourdough starter, but letting it ferment overnight adds real artisan appeal.
How to make a Pre-ferment
Making a poolish is SO simple! The night before you plan to bake bread, you’re going to mix up equal amounts of unbleached all purpose flour and water, with a tiny pinch of dry active yeast. Give it a good mix, then cover the bowl with a clean kitchen towel or plastic wrap.
Let the poolish ferment overnight, and the next morning it should be puffy and bubbly, and very jiggly. In this recipe, you’ll add the whole amount of poolish to more flour and water for the final dough.
the difference between a poolish and sourdough starter
A poolish is a quick preferment that adds incredible texture and flavor to your homemade bread. It is made the night before. A traditional sourdough starter, on the other hand, is cultivated over about 7 days, and is based on harnessing wild yeast cultures in the air. A traditional sourdough starter is fed everyday, in order to be kept “alive,” then a portion is added directly to bread dough, or to make a levain. A poolish is a one-and-done deal. You mix up the poolish the night before, then add the full amount to your bread dough the following day.
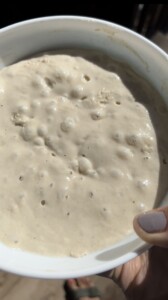
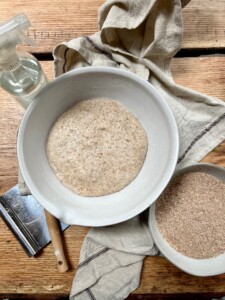
ripe poolish – ready to use!
ingredients
unbleached all purpose flour – I use unbleached all purpose flour from King Arthur Baking Company. It has a higher protein content than most AP flours. You could use bread flour if that’s what you have.
water – I use water that’s about 85 degrees F, slightly warmer than room temperature. It’s important that the water is not too hot, otherwise it will kill the yeast, and your bread won’t rise properly. A lot of the tap water in the US is treated with chemicals like fluoride and chlorine, which can negatively affect the rise of our dough. To avoid this, I prefer to use filtered spring water for all of my bread baking.
salt – I use Morton’s kosher salt in all of my bread recipes. If you are using Diamond Crystal, add another 4 grams of salt.
yeast – I use dry active yeast in this recipe, and my favorite brand is Red Star Yeast for its consistent and professional results. I mix the dry active yeast with the warm water to activate it, or “wake it up.” Also, I always store my yeast in the fridge to prolong its shelf life.
whole wheat flour – Using a bit of whole grain wheat flour adds a really nice nuttiness to this artisan bread, while still keeping it light and fluffy.
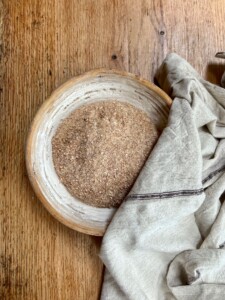
wheat bran – The bran is the hard outer layer of the wheat kernel, which is jam-packed with various nutrients and fiber. During the milling process, the bran is stripped away from the wheat kernel and becomes a byproduct. Wheat bran has a sweet, nutty flavor, and my favorite brand is Bob’s Red Mill.
how to make homemade bread
I know it may seem hard to believe, but making really homemade bread is a lot easier than you might think. We’re only using a few ingredients, and the amount of actual hands on work is very minimal. Most of the time, you’re just waiting around for the dough to bulk ferment/proof/rise (all the same thing!).
Baking schedule:
The evening before you plan to bake
7:00 pm – mix up the poolish (flour, water, and yeast). cover the bowl, and let ferment at room temperature.
The next day
8/9:00 am – mix up the final dough ingredients (flour, whole wheat flour, wheat bran, water, salt, and the entire poolish). Cover, let rest at room temperature.
9:30am – stretch and fold the dough gently by pulling up the sides of the dough and folding it over on itself, working your way all around the dough.
10:00am – stretch + fold # 2, cover, let rest at room temperature.
10:30am – stretch + fold #3, cover, let rest at room temperature for 2-3 hours until almost doubled in size.
1:00pm – shape the dough into a loaf and coat the crust in wheat bran, let proof in a proofing basket for 1 – 1.5 hours.
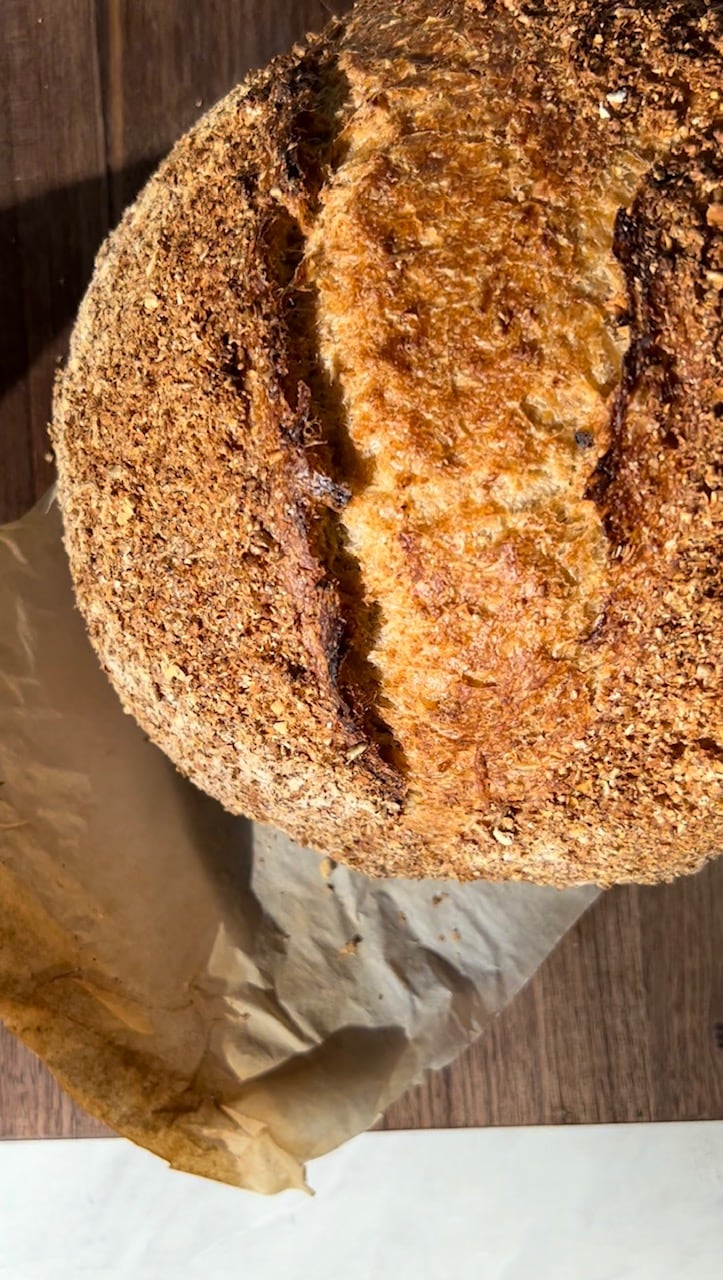
2:00 pm – bake for 50-55 minutes until deeply golden brown. Let cool for at least 1 hour before slicing.
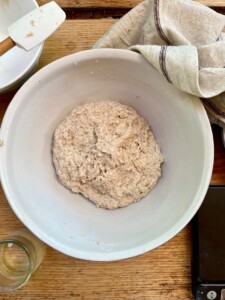
just mixed dough
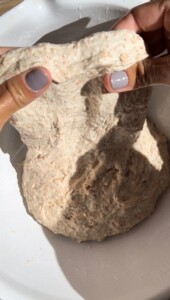
stretch the dough up

and fold!
bulk fermented dough
coated in wheat bran

airy open crumb
TOOLS I USE:
- Large mixing bowl – one the most FAQ, this is my favorite bowl for mixing dough!
- kitchen scale – this is an absolutely necessary tool for baking bread. If you want consistent, professional results, weighing your ingredients with a scale is a must.
- Danish dough whisk – this is a quirky looking tool that is actually very useful for mixing up bread dough. If you make bread often, I highly recommend getting one!
- small spray bottle – This basic little tool comes in handy for adding just a little extra shot of extra steam to the oven. Sometimes I spray the tops of the rolls before I place them in the oven to get a blistered crackly top.
- bread lame for slashing dough – there are many styles of bread lames, and ultimately choose the one that is most comfortable in your hand. I love this round style, and I’ve tried almost every style out there.
HOW TO STORE
This delicious Harvest Bread is best stored at room temperature for up to 3 days. Or, place it an airtight bag, and freeze for up to 1 month.
I can’t wait to see your take on this Harvest Bread with Poolish. Remember to tag me @lions.bread in your pics so I can all of the delicious things you’re making from my site. I love seeing my recipes come to life in your kitchens!
Want save this recipe for later? Just click on the “Pin It” buttons on any of the images to save it to your favorite Pinterest Board.
xo – LeAnne
Harvest Bread with Poolish
Ingredients
The Poolish
- 250 g unbleached all purpose flour
- 250 g water warm/room temperature about 80°F
- 1 pinch dry active yeast 1/16 teaspoon
The Final Bread Dough
- 200 g unbleached all purpose flour
- 50 g whole wheat flour
- 140 g water warm/room temperature about 80°F
- 1 g dry active yeast
- 40 g wheat bran
- 11 g kosher salt
- 500 g poolish
Instructions
Make the poolish
In a medium size mixing bowl, combine the water, unbleached all purpose flour, and pinch of dry active yeast. Mix until thoroughly combined, and then cover the bowl with a clean kitchen towel, or plastic wrap. Let ferment at room temperature for 12-14 hours. The poolish should look be bubbly, jiggly, and puffy.
Make the final dough
To a large mixing bowl, add the all purpose flour, whole wheat flour, wheat bran, and 1 gram of yeast. Mix to combine. Pour all of the water around the edge of the bowl with the poolish. This will help loosen up the poolish. Pour the watery poolish into the bowl with the flour mixture (it should slip right out!). Use your clean hands to mix and pinch the dough together. It will be sticky, but use a spatula or a bench scraper to clean them off. Cover the dough with a clean kitchen towel or plastic wrap, and let sit at room temperature for 30 minutes.
Add the kosher salt to the dough, pinch it into the dough thoroughly. Then stretch and fold the dough, stretching the sides of the dough up, and folding it over itself. Work your way all the way around the perimeter of the bowl, then plop it over. Cover, and let rest for 30 minutes.
Stretch and fold #2. Cover, and let rest for another 30 minutes.
Stretch and fold #3. Cover and let bulk ferment for 2-3 hours at room temperature.
Pour the dough out onto a lightly floured surface. Pull the 4 sides of the dough into the center. Then pull the corners into the center. Turn the dough over (seam side down) and pull the dough toward you to perfect the boule shape.
Pour about 1 cup of wheat bran into a shallow bowl. Spray the dough with water, and dip the douugh into the wheat bran to coat the outer crust. This step is optional, but the wheat bran toasts and it adds a really nice nutty flavor.
Place the boule of dough, face down, in a floured proofing basket. Cover with a towel, and let proof at room temperature for 1 - 1½ hours.
Meanwhile, preheat the oven to 450°F. Place a Dutch oven inside to preheat as well.
Remove the preheated Dutch oven from the oven. Remove the lid. Cut a sheet of parchment paper in half. Place the parchment on top of the proofing basket, then invert the basket, so the dough is on top of the parchment paper. Slash the top of the loaf with a lame or sharp chef's knife.
Place the parchment and the dough into the Dutch oven. Cover with the lid, and place in the oven.
Bake for 25 minutes with the lid on. Then, remove the lid, and bake for another 22-25 minutes. The crust should be deeply golden brown.
Allow the bread to cool completely on a cooling rack for at least 1 hour before slicing.
Recipe Notes
For the ideal baking timeline, see the details in the post.
The post Harvest Bread with Poolish first appeared on Lion’s Bread blog.
Maria Donahue says
When mixing the final dough, adding flour you omitted the yeast to the mixture.
LeAnne says
Sorry for the oversight, it’s fixed now, thanks for catching that!