Lazy Girl Sourdough™ Bread
the most hands-off loaf of 100% naturally leavened bread - crusty, airy, chewy Sourdough Bread, even if you're feeling a bit lazy
Ingredients
- 500 g unbleached all purpose flour
- 375 g filtered water, room temperature
- 12 g kosher salt (I use Morton's) use 2.5 tsps if you're using Diamond Crystal
- 90 g sourdough starter, fed or unfed is fine
Instructions
-
In a large mixing bowl, combine water and sourdough starter, using your hand to dissolve the stater into the water. Add the flour and salt. Use a danish dough whisk or your clean hands to mix the dough. Pinch the shaggy dough to incorporate all of the flour. Scrape the bowl as you go. The dough will be very shaggy. If it feels really dry, add another tablespoon or two of water, and keep pinching and mixing until no dry patches of flour remain. Cover the bowl with a clean kitchen towel, and let rest for 20 minutes.
-
Do 1 stretch and fold rotation around the dough. Lift up one side of dough, and stretch it up gently, then lay it over the ball of dough. Continue lifting sides of the dough, until you've worked your way around the entire ball of dough. Use you hand to scoop up the dough ball, and flip it over. Cover with a kitchen towel, and let rest for another 20 minutes.
-
Repeat the stretch and fold process all the way around the perimeter of the dough, then flip the dough over. Cover with plastic wrap, or a dough cover, and let bulk ferment (rise) at room temperature for 12-18 hours, or until the dough has doubled in size.
-
Flour a proofing basket really well. Or, you could line a medium size mixing bowl with a clean kitchen towel, and thorough cover the inside of it with flour. Pour the dough out onto a well floured work surface. Do a quick preshape by bringing all 4 corners of the dough into the middle, overlapping. Flip it over and let it sit on your floured board for about 10 minutes. Now for the final shape: flour your work surface again. Flip the dough over, and begin bringing the sides in towards the center, then roll the dough up, until a nice tight boule is formed. For more tension, you gently drag the dough towards you on the board. Pinch the bottom shut, and place SEAM SIDE UP in the prepared proofing basket. Sprinkle the top with flour, and cover with a kitchen towel. Let the dough rise at room temperature for 2-3 hours until it puffy, jiggy, and has almost doubled in size.
-
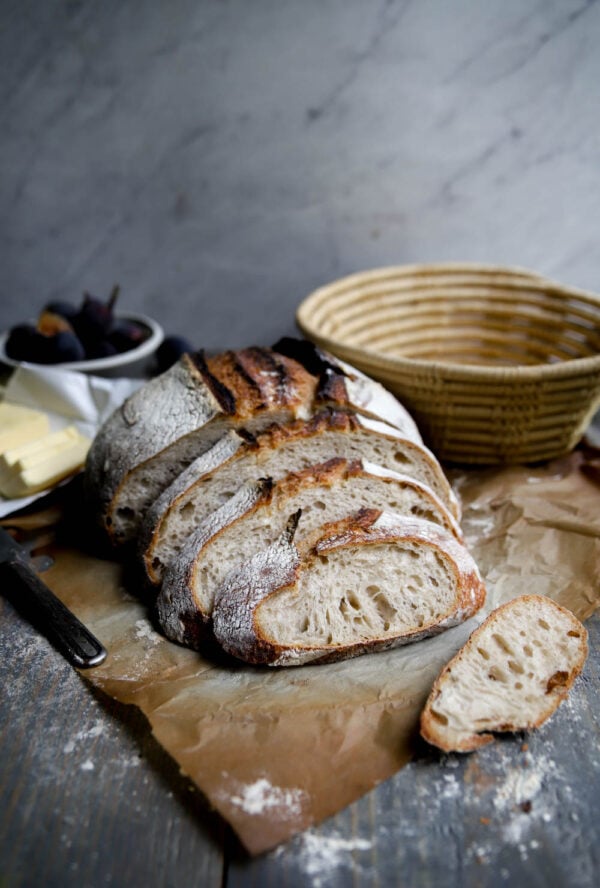
Preheat your oven to 450 degrees F, with a enamel coated coast iron Dutch oven inside. When your dough has risen, turn it out onto a piece of parchment paper. Slash/score the top with a lame or sharp chef's knife. The slash can be decorative, or a simple straight line down the center, about 1/2" deep. Remove the extremely hot dutch oven from the oven, using oven mitts, and remove the lid. Lift the corners of the parchment paper with the dough on it, and gently place into the hot pot. Cover with the lid, and bake for 25 minutes. Remove the lid, and return the pot to the oven for another 25 minutes to allow the loaf to brown. The crust should be dark brown, even mahogany in some places.
-
Remove the baked loaf, and allow to cool completely on a rack before slicing into it. This should take about an hour.
-
The best way to store fresh bread is in a paper or plastic bag at room temperature for up to 4 days. If you want to freeze the bread, slice it first, then freeze.
Recipe Notes
Your sourdough starter can be fed or unfed. I often use mine cold from the fridge. If you haven't used your starter in more than 1 month, I would feed it at least once before using it here.
**head to my instagram @lions.bread for a FULL VIDEO TUTORIAL